Running an Extraction
LiftOff guides you through a four-step wizard — gather QB reports, extract your data, verify the results, and upload everything to Pivoten.
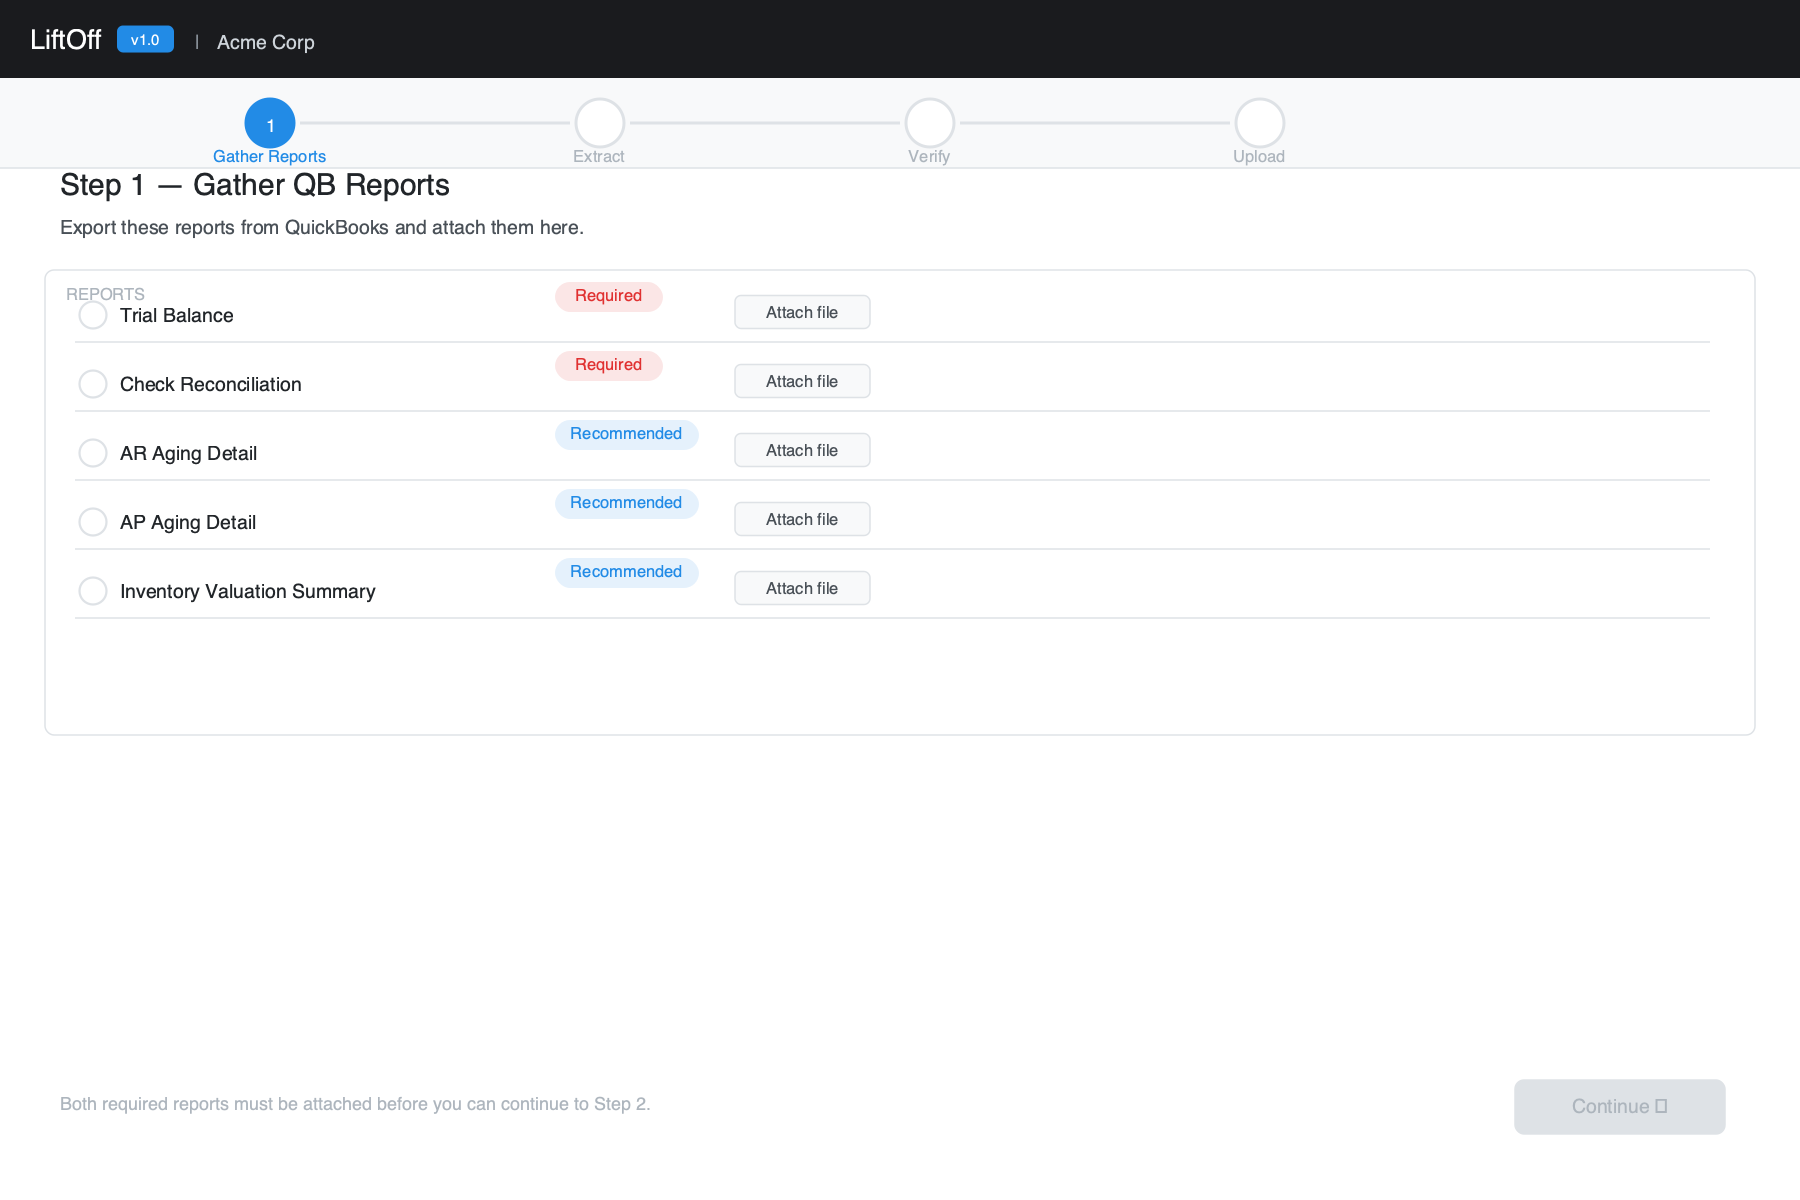
Step 1 — Gather QB Reports
Before extracting, export the following reports from QuickBooks and attach them in LiftOff. These reports give Pivoten the reference data needed to verify the migration and reconcile balances.
| Report | QB menu path | Required? |
|---|---|---|
| Trial Balance | Reports → Accountant & Taxes → Trial Balance | Auto-fetched |
| Check Reconciliation | Reports → Banking → Previous Reconciliation | Required |
| AR Aging Detail | Reports → Customers & Receivables → A/R Aging Detail | Recommended |
| AP Aging Detail | Reports → Vendors & Payables → A/P Aging Detail | Recommended |
| Inventory Valuation Summary | Reports → Inventory → Inventory Valuation Summary | If applicable |
Trial Balance: Fetched automatically from QuickBooks during extraction — no manual export needed. If you need to override it, click Override and attach a CSV, XLS, or XLSX file.
Check Reconciliation: Export as PDF or XLS. Click Add account to attach one file per bank account. At least one file is required before you can continue to Step 2.
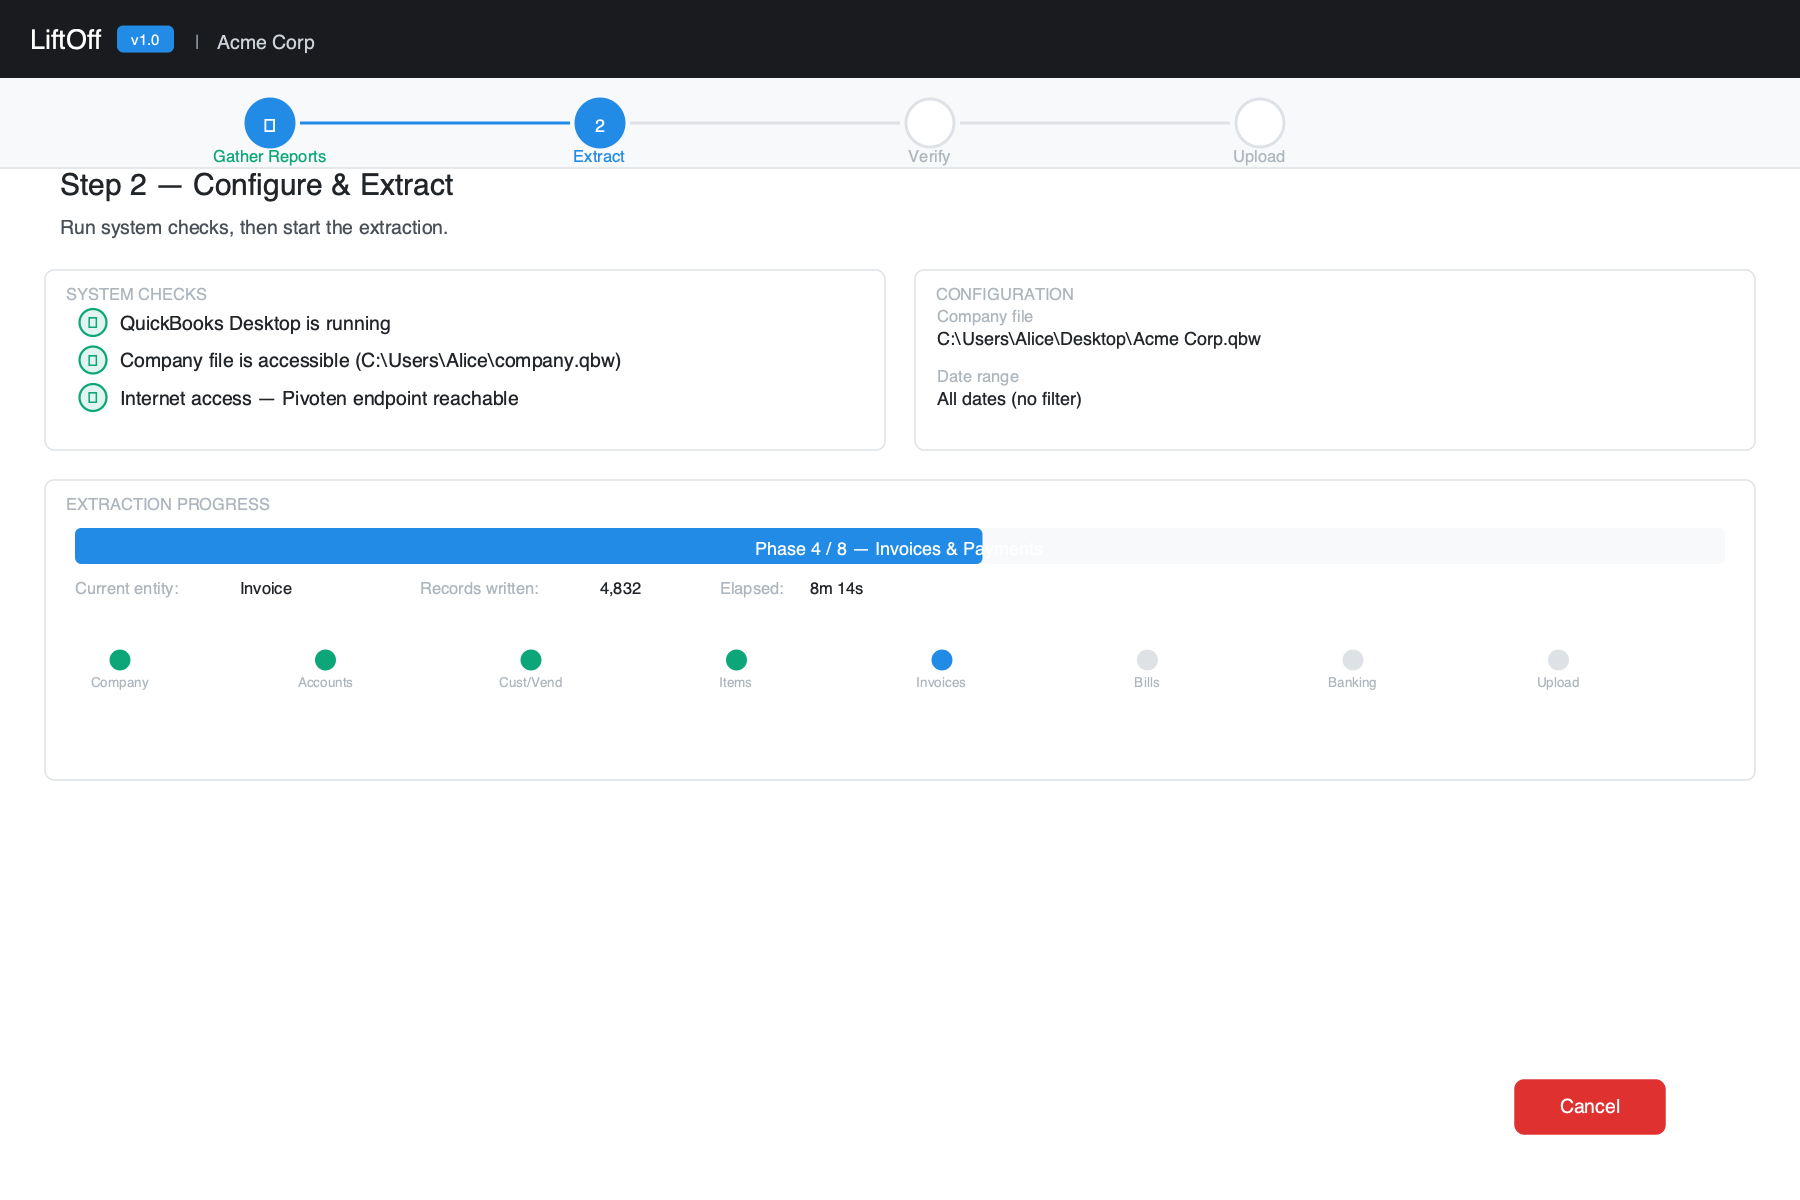
Step 2 — Configure & Extract
The extraction panel shows System Checks at the top. All three must pass before extraction can begin:
| Check | What it verifies |
|---|---|
| QuickBooks Desktop | QuickBooks is running on this computer |
| Company File | The configured .qbw file exists and is readable |
| Internet Access | Your computer can reach Pivoten's upload endpoint |
If a check fails, a suggested fix appears below it. Click Check again after resolving the issue.
Once checks pass, click Start Extraction. LiftOff will:
-
1
Connect Open a QBXML session with QuickBooks. On first connection, QuickBooks may show a permission dialog — click Yes, always allow access to grant permanent access.
-
2
Extract Read all QuickBooks data in dependency order: lookup tables first, then name lists and items, then transactions. A progress bar shows the current phase, entity type, and record count.
-
3
Package & upload Compress the extracted data into a snapshot file and upload it to Pivoten. Large snapshots upload in chunks automatically — no action required on your part.
Do not close QuickBooks while an extraction is in progress. Closing QB will interrupt the QBXML session and fail the extraction. You can continue using QB normally, though it may feel slower.
LiftOff saves a checkpoint after each completed entity type. If the extraction is cancelled or fails mid-run, clicking Start Extraction again resumes from the last successful step. Checkpoints are kept for 48 hours.
While an extraction is running, Reconfigure extraction and Switch workspace are disabled in the workspace menu, and the sign-out button is unavailable. You must cancel the extraction first before changing workspaces or reconfiguring. If you close and reopen the app while an extraction is running, LiftOff automatically returns you to Step 2 so you can monitor progress. A yellow Extraction running item in the workspace menu also lets you jump back to Step 2 at any time.
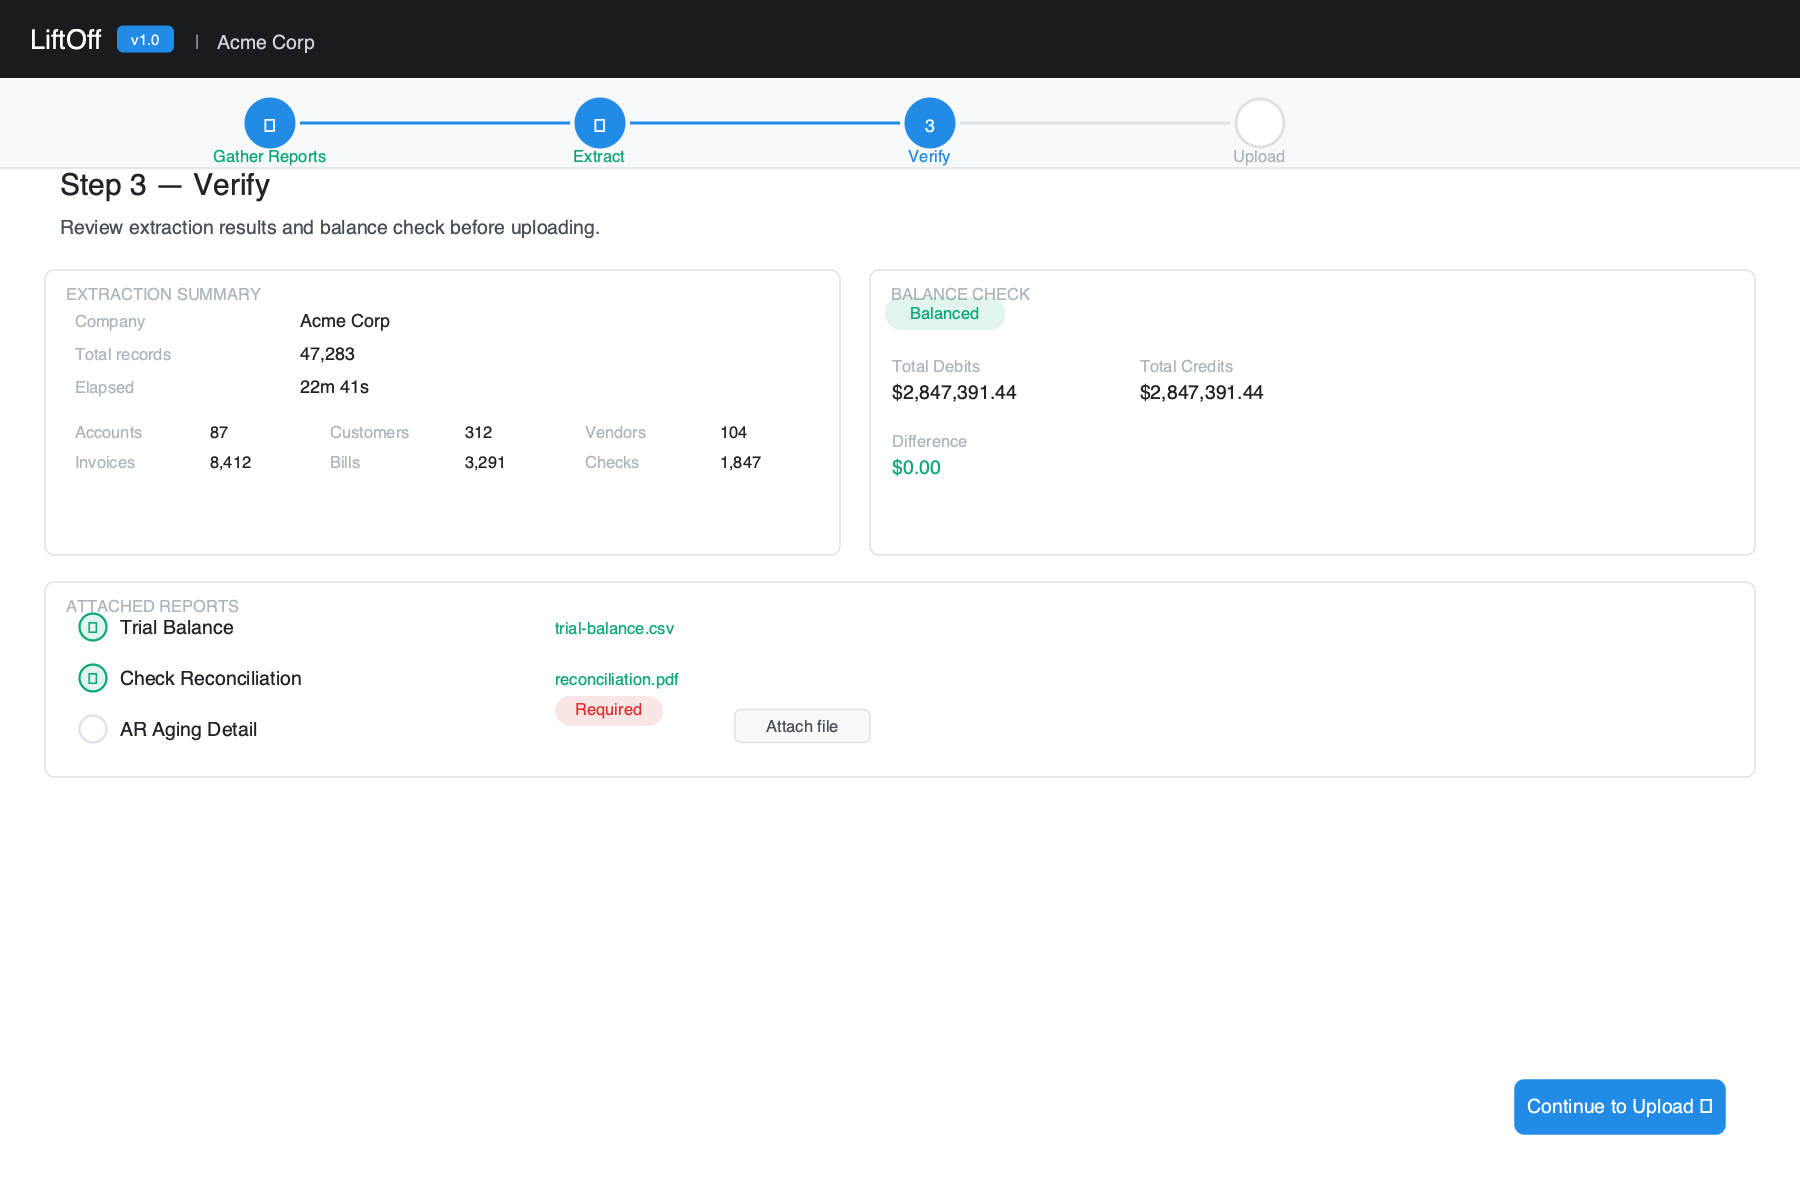
Step 3 — Verify
After extraction completes, the Verify step shows:
- Extraction report — record counts for every QuickBooks entity type extracted, total records, company name, and elapsed time.
- Balance check — LiftOff computes total debits and credits from the extracted data. The Trial Balance fetched during extraction is matched against these totals automatically. A green Balanced badge means debits equal credits; an orange badge means a variance was found (you can still continue — Pivoten will investigate).
- Attached reports — a checklist confirming which QB report files are attached. The Trial Balance row shows whether it was auto-fetched or overridden. Missing required reports are flagged in red.
- Skipped entities — if LiftOff encountered errors on specific entity types, they are listed here. Contact Pivoten support if critical data types were skipped.
This step is advisory — you can proceed to Upload even with warnings. Review any issues and decide whether to re-run the extraction before continuing.
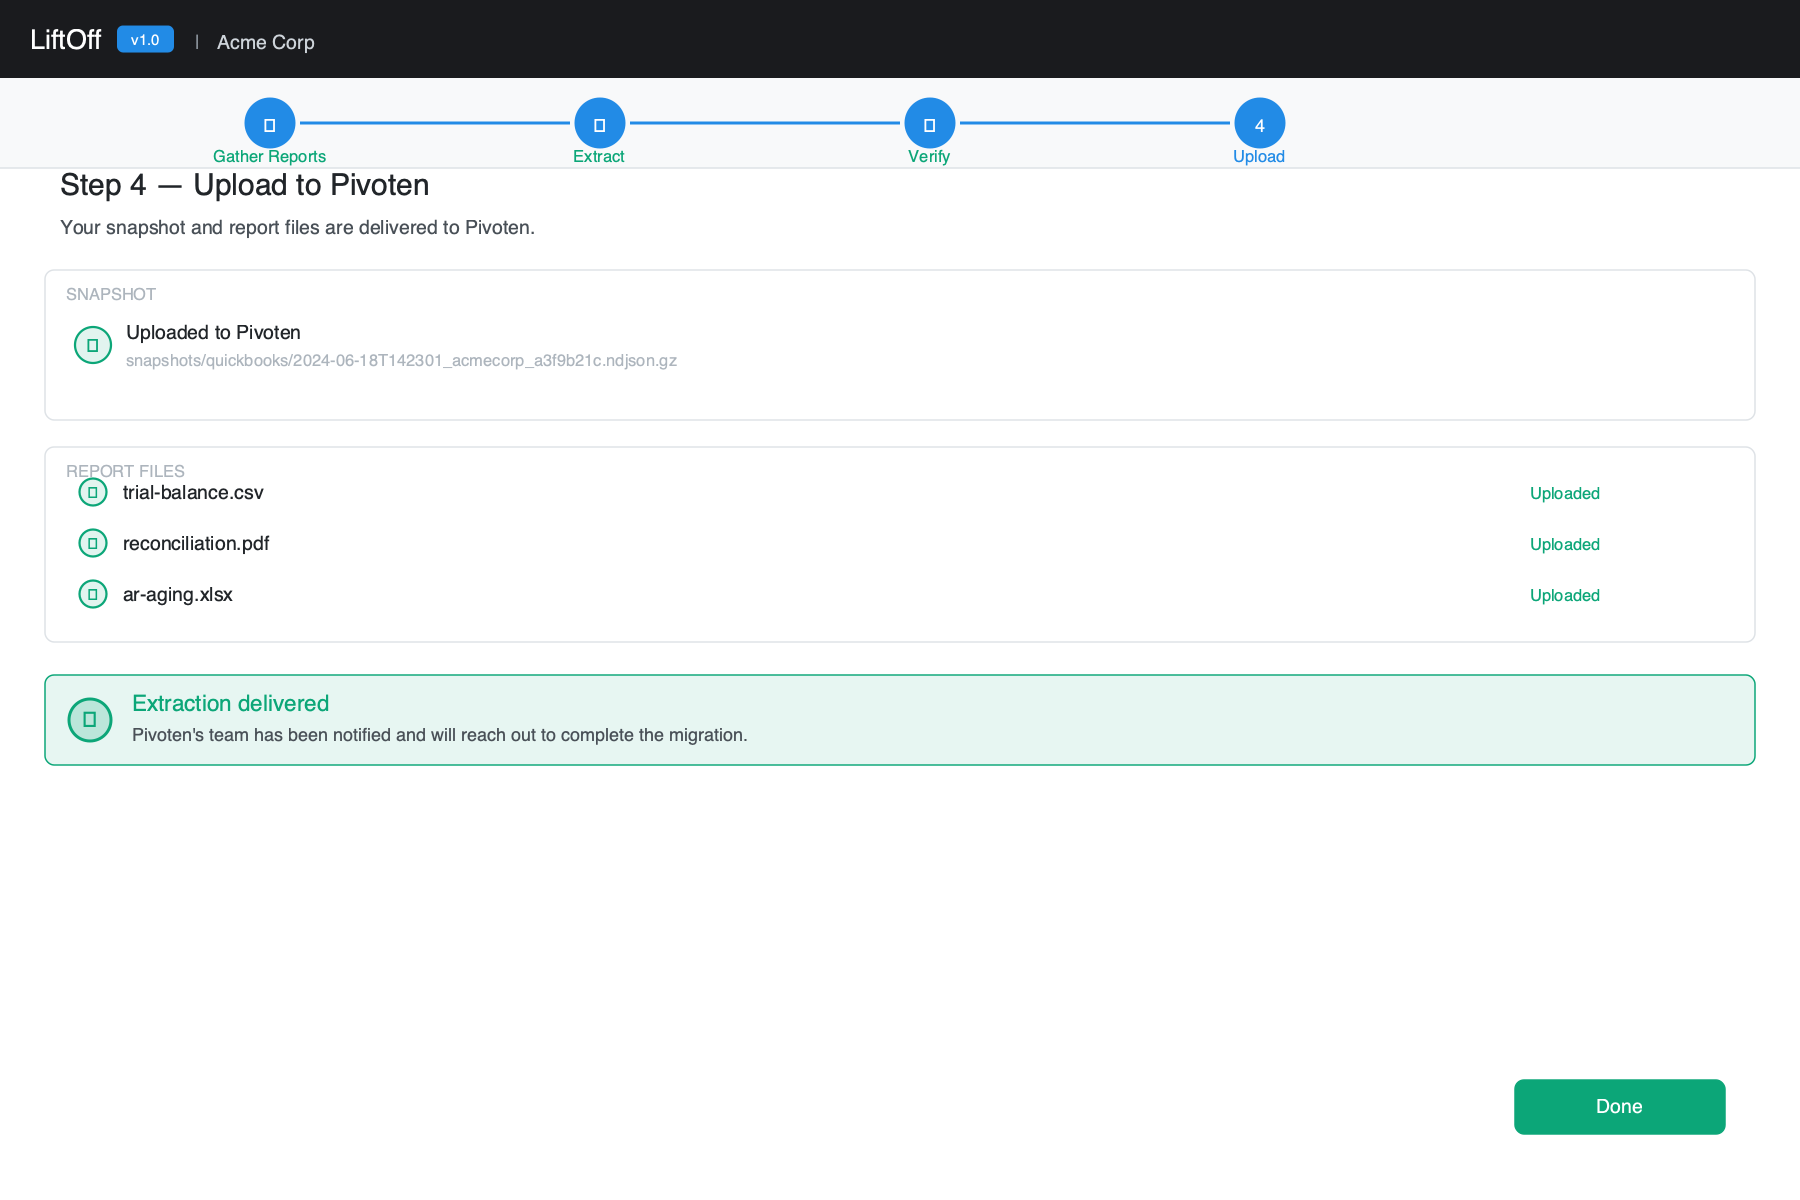
Step 4 — Upload
The Upload step delivers everything to Pivoten.
Snapshot
If your delivery is set to Pivoten Cloud, the snapshot was uploaded automatically at the end of Step 2. The storage key is shown here as a reference ID. If delivery is set to Local File, the saved file path is shown.
Report files
Click Upload Reports to send all attached QB report files to Pivoten as companion artifacts. Each file shows its upload status. If a file fails, the error is shown next to that file — you can retry by clicking Upload Reports again.
Once the snapshot is delivered and reports are uploaded, a confirmation message appears. Contact your Pivoten account team to proceed with the migration into Accounting Manager.
Step 5 — Convert
The Convert step extracts a blank Pivoten Accounting Manager database template into a Converted Data folder alongside your snapshot. This folder is the starting point for populating the AM FoxPro database with your QuickBooks data.
The template (395 FoxPro files — .dbf, .CDX, .FPT, .dbc) is embedded directly in the LiftOff executable — no internet connection is required and nothing extra needs to be installed.
Click Convert to extract the template. The output path is shown on screen and can be copied to the clipboard. The folder is overwritten on each convert, so re-running is safe.
Extraction artifact
After every successful extraction LiftOff writes a Markdown report file alongside the snapshot, named YYYYMMDD-HHMMSS-<id>.md. It lands in your configured output directory (local runs) or ~/Documents/LiftOff Exports/ (cloud runs).
The artifact records:
- Company name, snapshot ID, date range, and elapsed time
- Record counts per entity type — the authoritative count of every QuickBooks data type extracted
- Skipped entities (if any), with a pointer to the log file
- Whether the Trial Balance was auto-fetched and how many rows it contained
Keep this file alongside the snapshot. If questions arise during migration ("why are there only 5,000 invoices?"), the artifact is the first thing to check — it tells you exactly what LiftOff saw at extraction time without needing to decompress the snapshot.
How long does it take?
| Company file size | Typical extraction time |
|---|---|
| A few years of history, moderate volume | 15 – 45 minutes |
| Many years of data or high transaction count | 45 minutes or more |
The upload adds a few minutes on top of extraction time, depending on your internet speed.
Troubleshooting
On first connection, choose Yes, always allow access so LiftOff does not prompt on subsequent runs.
Open QuickBooks Desktop and load your company file, then click Check again on the System Checks panel in Step 2.
The path saved in your workspace no longer points to the .qbw file. Use Reconfigure extraction… from the workspace menu (top-right corner) to browse for the file again.
Your internet connection is down, or a firewall is blocking outbound HTTPS traffic to s3.amazonaws.com:443. Check your network settings or contact your IT department.
Click Start Extraction again — LiftOff resumes from the last completed step rather than starting over. If the error recurs on the same step, check the log file path on the error screen and include it when contacting Pivoten support.
Open the workspace menu (top-right corner) and select Enable verbose logging. This writes additional detail to the log file. Disable it after troubleshooting to avoid large log files.
Reopen LiftOff — it will detect the in-progress extraction and automatically return you to Step 2 where you can monitor or cancel it. The extraction goroutine continues running in the background as long as the app is open.